|
Getting your Trinity Audio player ready... |
You feel stranded and need a Nigeria travel visa!
You have an emergency or a short business trip that requires you to travel to Nigeria, and you urgently need an entry visa to Nigeria. There is, however, no Embassy of Nigeria in your country of residence, or you need to travel several hours to another city in your country to get to the Nigeria Embassy. Whatever your situation or need is, no worries; a visa on arrival to Nigeria is an excellent option for you.
A visa on arrival is only, in fact, strictly for business purposes, so if you’re not travelling for any business meetings or business deals, then you do not qualify to apply for a visa on arrival. Once your visa on-arrival approval is granted, it is valid for 14 days. Hence, you have up to 14 days to travel to Nigeria; otherwise, you cannot use that visa-on-arrival approval that was given.
So, in this article, I will be showing you how to apply for a visa on arrival, all the required documents, the cost, and how to check the status of your application. That is, to check if your visa-on-arrival application has been approved or declined. I will show you step-by-step how to navigate through the visa-on-arrival application platform and teach you how to apply for a visa on arrival.
Key instructions on applying for a visa on arrival to Nigeria
- The information you provide must match the information on your passport. Any discrepancies will cancel your visa application.
- Each application form is meant for one person only. A separate application has to be filled out for each applicant.
- Each passport must have a minimum validity of six months as of the date of submission of the application.
- Applicants are requested to verify their application details before making payment.
- Applicants have the option to save their application if they choose not to pay online.
- Letters (A-Z, a-z), numbers (0-9), periods (.), hyphens or dashes (-), apostrophes (‘), and spaces are the allowable characters for names.
- You should note down the application and reference numbers of your application. This will help in any future communication with respect to your application. You can also take a printout of your completed or paid application for this purpose.
- There must be a 3-day interval between your application submission date and the date you intend to arrive in Nigeria.
How long does it take for a visa on arrival to be issued after your application?
Usually, when you apply and upload all the necessary things accurately on the visa portal, it takes about 48 hours to get feedback on your application, whether it is approved or declined.
Nigeria Travel Visa Application Procedures: A Step-by-Step Guide
Note that the Nigerian Immigration Service, headquartered in Abuja, Nigeria, processes and issues visas on arrival. Many people make the mistake of contacting or applying for a visa on arrival through the Nigerian Embassy or Consulate in their home country. This is wrong. The Nigerian Embassy or Consulate does not issue visas on arrival.
Visit www.innovate1services.com . That is the authorized website service provider for applying for visa on arrival to Nigeria. On the main page of this website, click on ‘Services’, and select ‘Passport and Visa on Processing’ and proceed to Apply Online option as seen on the below screenshot.
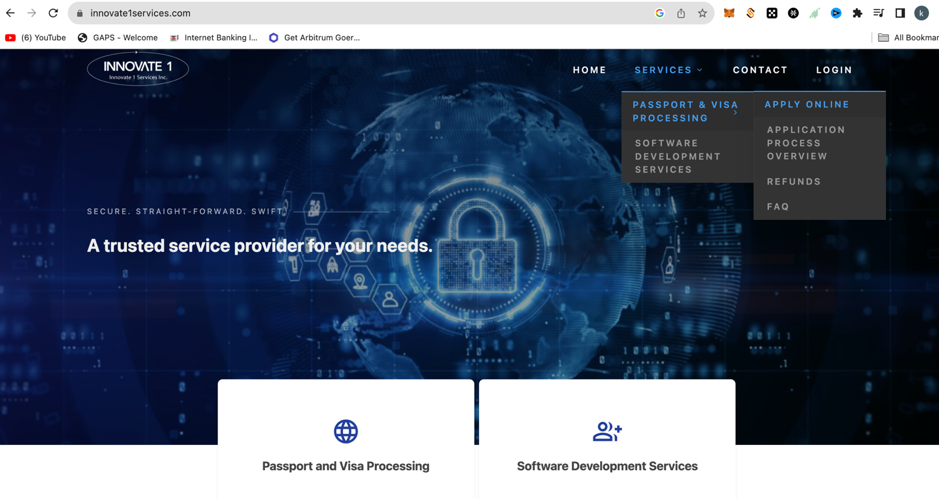
VOA to Nigeria: Visa on Arrival application portal
You will be automatically navigated to the visa on arrival page (www.voa.immigration.gov.ng), where you will be required to create an account by registration with your email address and password.
Once you are logged into the visa on arrival application page, you will realise there are five sections of information you need to provide to apply for your visa on arrival to Nigeria. They are.
1. General Information
2. Biodata
3. Travel Information
4. Contact and hotel details in Nigeria
5. Supporting Documents and Payment
Step 1: Complete the General Information section.
The first section of the information you need to provide covers general information about the nationality of the traveler, the type of passport and the class of visa you intend to apply. It is important to note that visa on arrival is meant for business purposes only. Hence under the category ‘class of visa’, kindly select ‘business’ as the option from the drop-down box. If your reason/purpose for your intended trip to Nigeria is any other reason than ‘business’, then you should not apply for visa on arrival.
The total visa fees are automatically displayed once you fill in your nationality details and the type of visa. It is important to note that in Nigeria, the cost of a visa on arrival depends on the nationality of the person. So, the visa fees vary with the nationality.
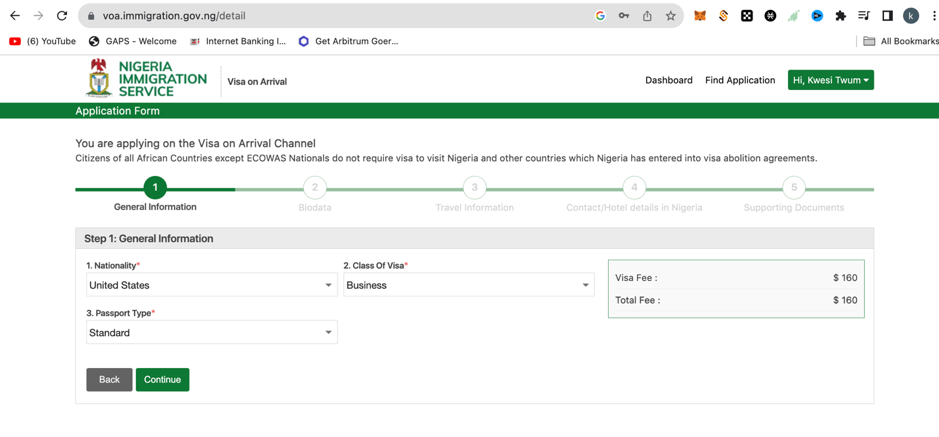
VOA to Nigeria: General Information
Step 2: Complete your biodata section.
The information needed to complete this biodata section includes first name, surname, date of birth, place of birth, gender, passport number, marital status, and passport expiration date. If you are not under the age of 18, you can proceed to fill up your passport information in the Biodata section of the visa on arrival portal. You are also required on this page to upload your passport-sized photo. The photo must be clear, and the background of the passport photo must be plain.
You need to ensure that the information you provide matches the information on your passport. Any discrepancies in the information you provide in this section will lead to the cancellation of your visa application. It is also important to ensure your passport has a minimum validity of six months as of the date of submission of your visa on arrival.
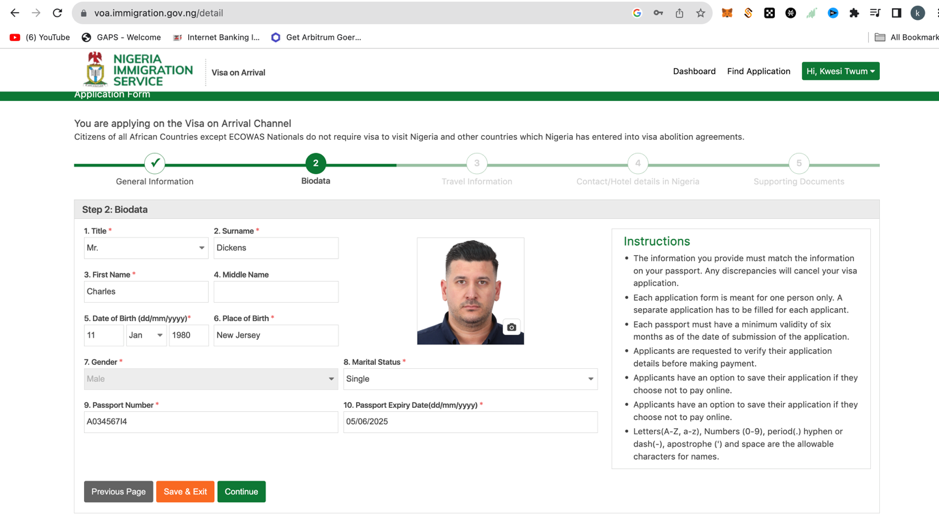
VOA to Nigeria, Biodata Section
Step 3: Complete Travel information and Hotel details
This is the section of the visa application process where you provide information about your intended travel to Nigeria. Information you need to provide includes flight information, hotel name and address, contact number, city and state where you will be staying during your travels to Nigeria, and email address. Click on the Continue tab once you are done filling in all this information.
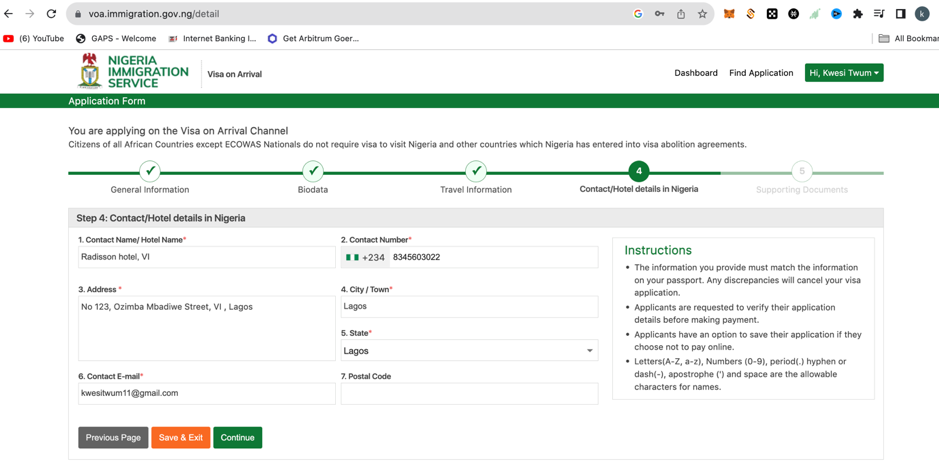
VOA to Nigeria: Travel Information
Step 4: Upload all supporting documents – Required Documents
This is the section of the visa on arrival application process where you upload all supporting documents for your visa. The Nigeria Immigration Service will review these documents before giving approval for your visa. So, ensure you upload genuine and accurate information. Any discrepancies, mistakes, and errors may lead to a disapproval of your visa on arrival.
Required documents for visa on arrival
The following are the required documents for visa on arrival that should be uploaded on the portal:
1. International passport with at least 6 months of validity
2. A letter of invitation from your host inviting you to Nigeria, stating the purpose of travel, duration of travel, place of stay, and an indication of who will be funding the trip, etc.
3. Introduction letter: This is needed from your host to provide further information, reasons, or nature of the business relationship that exists between yourself and them for which they are inviting you. It is also particularly needed when the business trip is not being self-funded by the traveler.
4. Flight itinerary/flight booking – it doesn’t have to be fully confirmed or paid ticket but it must a round trip booking, not one-way.
5. Scan copies of the CAC certificate or business registration documents from your host.
6. Any other supporting documents that may help the Nigerian Immigration Service validate your reason(s) for your intended travel to Nigeria
When you are done uploading all the information, click on Continue to proceed to the final review and submission page.
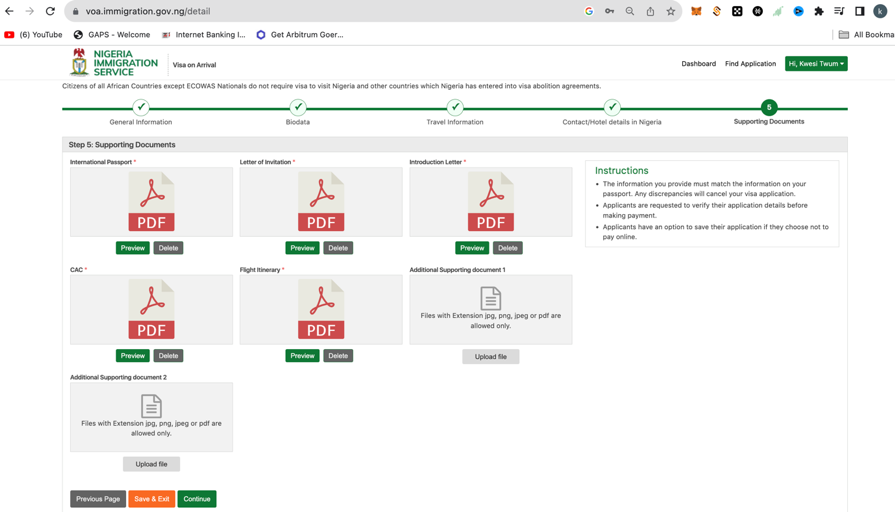
VOA to Nigeria: Upload all supporting visa documents
Step 5: Submit your application and proceed to make payment with your card.
The next step is the review of all the information you have provided and then final submission. It is important to carefully review all information you have provided before the final submission. You have the two submission options; ‘submit and pay now’ or ‘submit and pay later’.
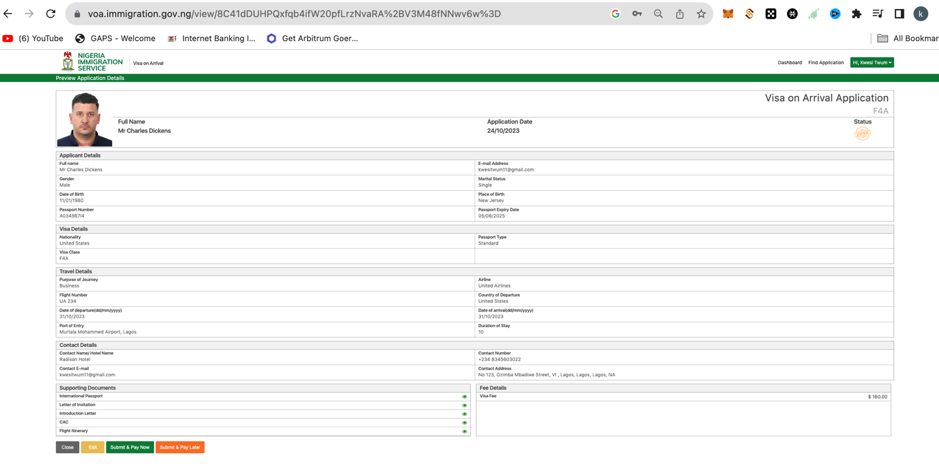
VOA to Nigeria: Final Visa Submission Page
Step 6: Payment of fees for your Nigeria Travel Visa
On this final step, you need to carefully read the payment terms and conditions before proceeding to make the final payment. It will ask you to pay online, and then you’ll pay with your Visa card or Mastercard. Remember that the name on the card has to also match the name on the application, so that means you have to use your card yourself to make the payment.
There are conditions for refunds and acceptable payment card options. Carefully read all terms and conditions, tick the disclaimer boxes, and proceed to pay. Congratulations! You have successfully completed your Nigeria visa on arrival application.
You should note down the application and reference numbers of your application. This will help in any future communication with respect to your application. You can also take a printout of your completed or paid application for this purpose.
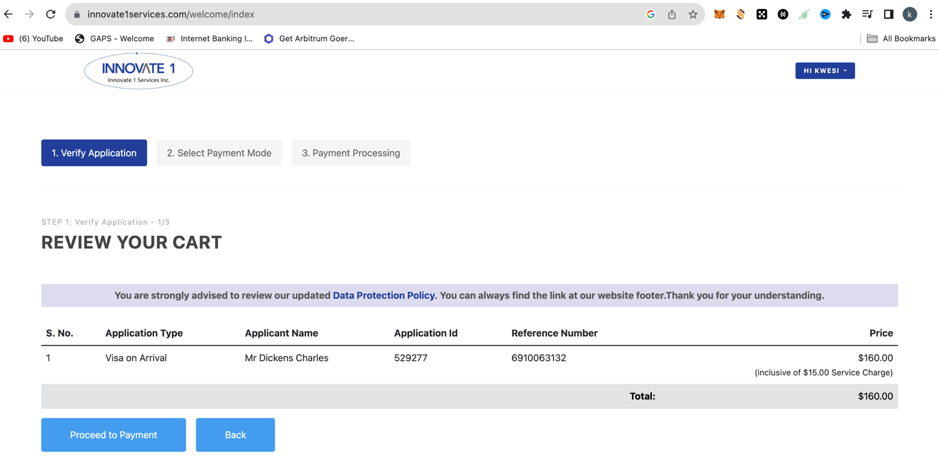
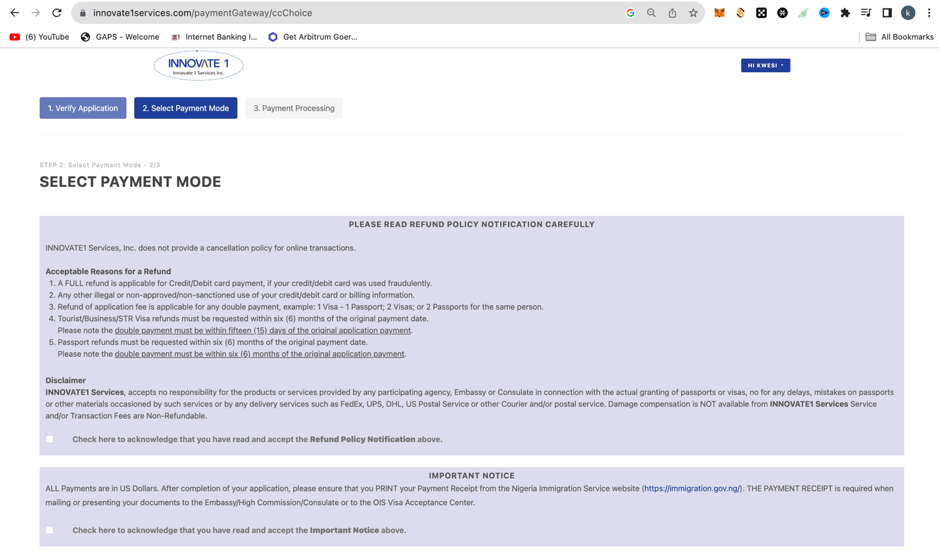
VOA to Nigeria: Payment for visa on arrival
Checking the status of your visa on arrival (Nigeria Travel Visa)
If you want to check if your visa on arrival application has been approved, you need to go to the Nigerian Immigration Service website, www.portal.immigration.gov.ng. Now look for the tab ‘Application Status’ on the home page of the website.
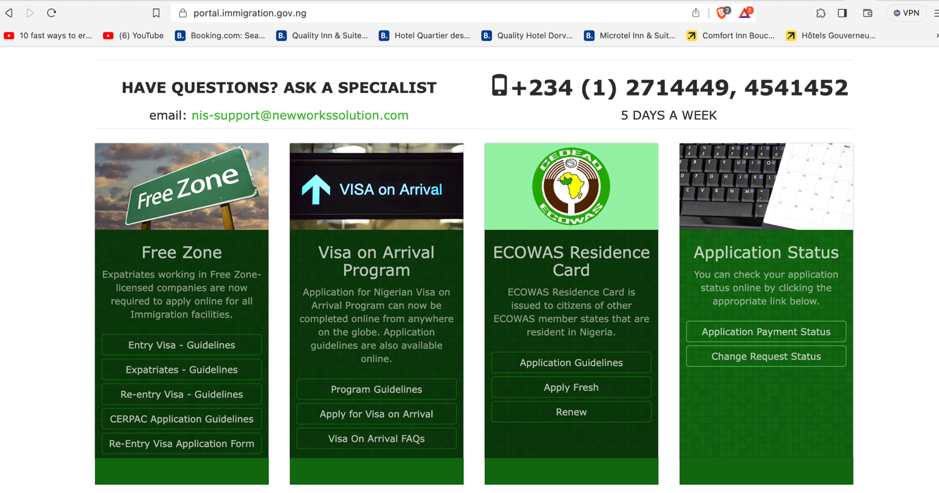
When you click there, it will take you to the next page where you select ‘visa on arrival’ from the menu bar, then you type in your ID number and reference numbers that you generated when you filled the visa on arrival application form.
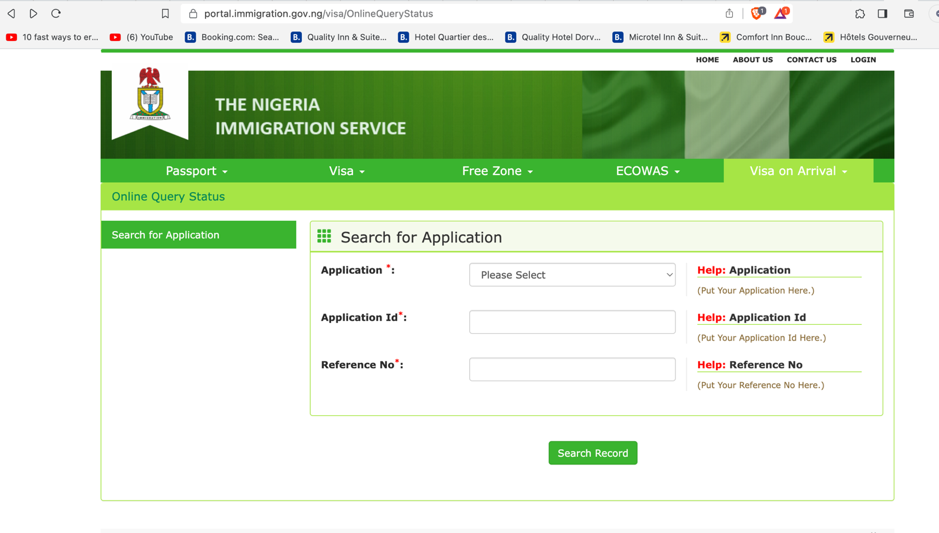
When you do this, it’s going to give you an update on your application status, whether it has been approved or not.
If your visa is approved, go ahead and print the approval letter you will see on the portal. The visa on arrival letter will have a barcode and some numbers just below the barcode. It will also show your photo and personal data (passport number, full name, etc.). With this document in hand, you can proceed through all your airport departure formalities, and when you get to the airport in Nigeria, immigration is going to take your biometrics, and then they will issue the Nigeria travel visa to you.
Conclusion
If you need any help at all regarding your visa on arrival and Nigeria travel visa application, reach out to us here. Whether you need help making the whole application or applied yourself and yet have not received any approval or feedback and you urgently need to travel to Nigeria. Send us a message on WhatsApp or email or call us. We will get you sorted.

